A hydrometer is one of the most useful tools in homebrewing.
It can tell you how much sugar is dissolved in your beer, wine, cider, or mead.
More importantly, it can tell you when fermentation is complete.
This makes the hydrometer an important tool for:
- Beer
- Mead
- Cider
- Fruit wine
- Kombucha
- Other fermented drinks
A hydrometer is inexpensive and easy to use.
The basic process is:
Fill the test jar → insert the hydrometer → read the scale → record the result.
What Is a Hydrometer?
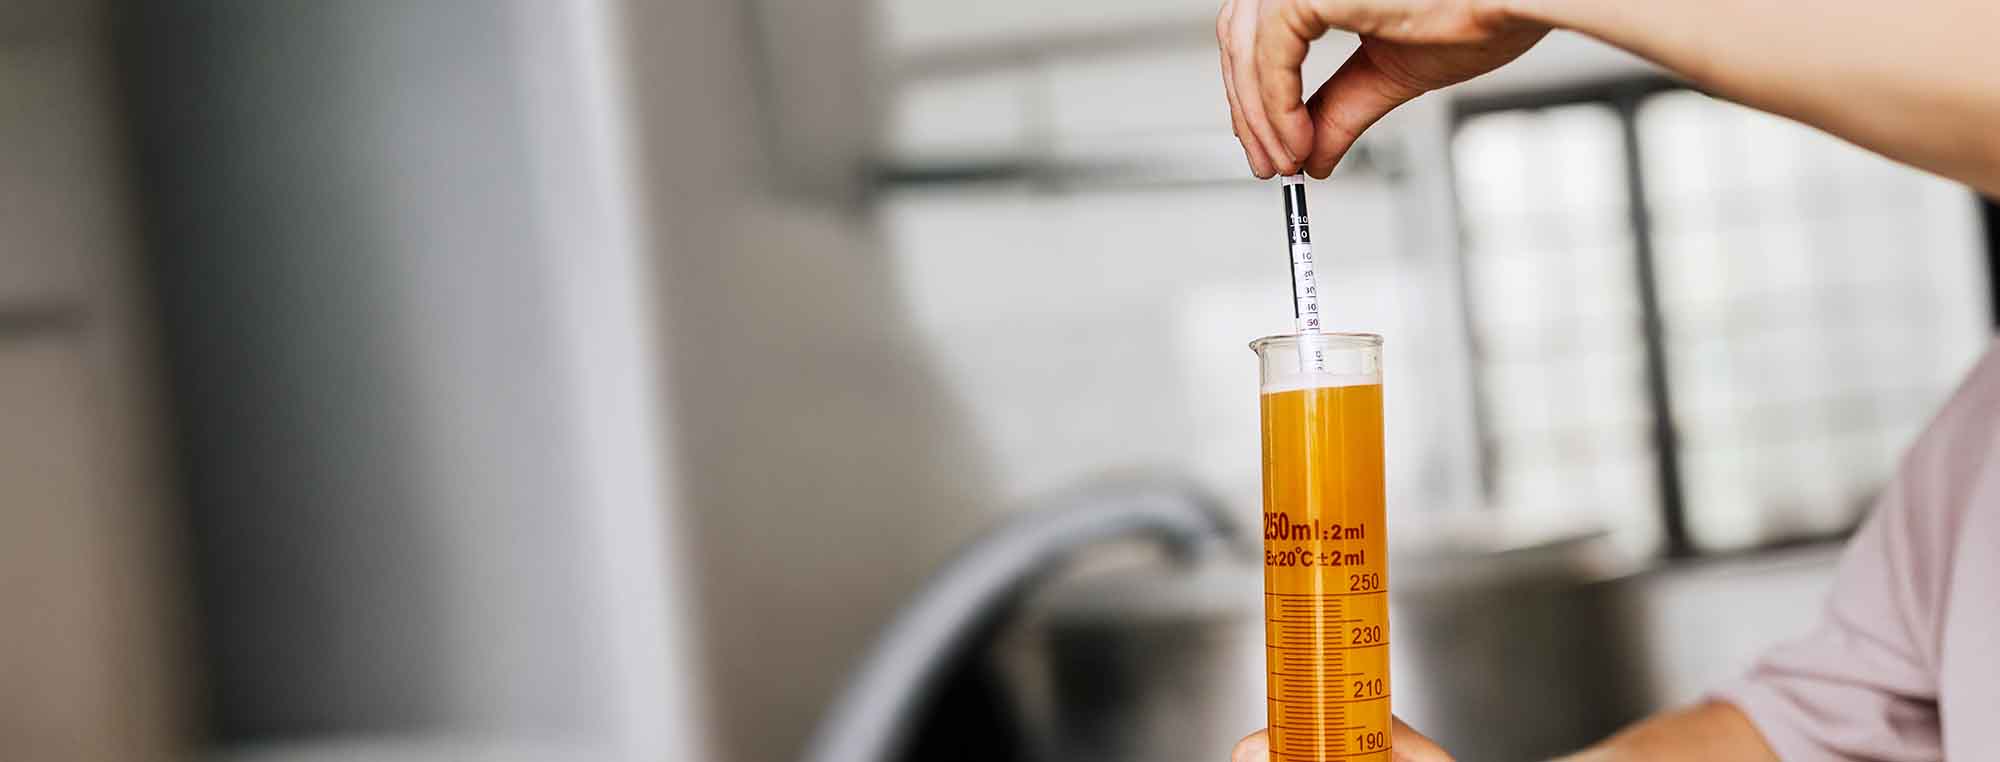
A hydrometer is a weighted glass instrument that floats in liquid. It measures the density of the liquid.
Water has a specific gravity close to 1.000.
A liquid containing dissolved sugar is denser than water. The hydrometer therefore floats higher. As yeast consumes the sugar during fermentation, the liquid becomes less dense. The hydrometer sinks lower. This creates a useful measurement.
For example:
Starting gravity: 1.050
Final gravity: 1.010
The decrease shows that the yeast consumed a significant amount of sugar.

Why Do Homebrewers Use Hydrometers?
The most important use is to monitor fermentation.
A hydrometer can help you determine:
- Starting gravity
- Fermentation progress
- Final gravity
- Approximate alcohol content
- Whether fermentation is complete
It can also help you identify fermentation problems.
The Three Most Important Readings
Most homebrewers use three types of gravity readings.
Original Gravity
Original gravity is usually called OG. It is the specific gravity of the liquid before fermentation.
For beer, you normally measure OG after the wort is mixed and cooled. For mead, cider, or wine, measure OG after the must is completely mixed.
Example:
OG = 1.080
This means the liquid is significantly denser than water because it contains dissolved sugar and other material. We have a full article on Original Gravity.
Fermentation Gravity
You can take readings during fermentation.
These readings show whether the gravity is decreasing.
For example:
- 1.080
- 1.060
- 1.035
- 1.015
The decreasing numbers show that fermentation is progressing. You do not need to take a reading every day. In fact, most homebrewers will wait weeks before taking their second hydrometer reading.
Frequent samples create unnecessary opportunities for contamination and waste your brew.
Final Gravity
Final gravity is usually called FG.
It is the gravity after fermentation is complete.
For example:
OG = 1.080
FG = 1.010
The difference between the two readings can be used to estimate alcohol content. Check out our article on Final Gravity.

What Equipment Do You Need?
You need:
- Hydrometer
- Hydrometer test jar
- Sample of beer, cider, wine, or mead
- Sanitizer
- Calculator, optional
A wine thief can make it easier to take samples from a carboy.
A sanitized siphon can also be used.
Choosing a Hydrometer
Most homebrew hydrometers are designed to measure specific gravity.
Many have a scale that covers approximately:
0.990–1.170
This range is suitable for most beer, cider, wine, and mead.
Some hydrometers have several scales.
They may include:
- Specific gravity
- Potential alcohol
- Brix
- Plato
For a beginner, specific gravity is the most useful scale.
What Is Specific Gravity?
Specific gravity compares the density of a liquid with the density of water.
Water is approximately:
1.000
A sugary wort may be:
1.050
A strong mead may be:
1.120
A finished dry beer may be:
1.008
A dry wine or mead can sometimes finish below:
1.000
Do not assume that every fermented drink must finish at 1.000. Different beverages have different starting and finishing gravities.
When Should You Take a Hydrometer Reading?
Take a reading when the information will help you make a decision.
Important times include:
Before Fermentation
Take the original gravity.
During Fermentation
Take a reading if you need to determine whether fermentation is progressing.
Near the End of Fermentation
Take a reading to determine whether fermentation may be complete.
Before Bottling
Take readings on separate days.
The readings should remain stable before you bottle.
Why Is the Final Reading So Important?
Suppose your beer has an original gravity of 1.060.
After two weeks, you measure:
1.012
Three days later, you measure:
1.012
The gravity is stable.
This is evidence that fermentation is complete.
Now compare that with:
- Day 14: 1.012
- Day 17: 1.008
Fermentation is still occurring.
Do not bottle yet.
Never Use Airlock Activity to Decide When to Bottle
An airlock is useful. It is not a substitute for a hydrometer.
A quiet airlock does not prove that fermentation is complete. A bubbling airlock does not prove that fermentation is active. The hydrometer gives you a measurement of the liquid.
This is especially important when bottle conditioning.
If you bottle beer while fermentation is still active, the yeast can produce additional CO₂ inside the bottle. This can cause excessive pressure.
How to Use a Hydrometer
Using a hydrometer is simple.
Step 1: Clean the Equipment
Clean the hydrometer and test jar.
Remove any dirt or residue.
Step 2: Sanitize the Equipment
Sanitize anything that will contact your fermented beverage.
This includes:
- Hydrometer
- Test jar
- Wine thief
- Siphon equipment
Follow the sanitizer manufacturer’s instructions.
Step 3: Take a Sample
Remove enough liquid to fill the test jar.
The hydrometer must have enough room to float freely.
A typical test jar requires approximately 4–6 ounces of liquid. The exact amount depends on the size of the hydrometer and test jar.
Take the sample gently, avoiding unnecessary splashing.
Step 4: Fill the Test Jar
Pour the sample into the test jar.
Leave enough space for the hydrometer.
Do not fill the jar to the very top.
Step 5: Insert the Hydrometer
Gently lower the hydrometer into the liquid. Do not drop it into the jar. Glass hydrometers can break.
Give the hydrometer a gentle spin. This can help remove bubbles attached to the glass.
Step 6: Wait for the Hydrometer to Stop Moving
Allow the hydrometer to settle.
Make sure it is floating freely.
It should not touch:
- The bottom
- The sides
- Foam
- Sediment
If it touches the test jar, the reading may be incorrect.
Step 7: Read the Scale
Look at the hydrometer at eye level.
Find the liquid surface. Read the specific gravity at the correct point on the scale. Most hydrometers require you to read the bottom of the liquid’s meniscus – the curved surface of the liquid.
Step 8: Record the Reading
Write down the result.
For example:
OG: 1.052
Later:
FG: 1.010
Recording your readings makes fermentation much easier to understand.
What Is the Meniscus?
Liquid does not always form a perfectly flat surface around a hydrometer. It usually curves slightly.
This curve is called the meniscus.
For most homebrew hydrometers, read the bottom of the meniscus. Keep your eyes level with the liquid. Do not read from above the jar. Looking from an angle can produce a reading error.
Temperature Matters
Hydrometers are calibrated at a specific temperature.
Many are calibrated at:
60°F (15.6°C)
Some are calibrated at:
68°F (20°C)
Check your hydrometer.
The sample temperature affects the reading. A hot sample can produce a different reading from the same liquid at the calibration temperature.
Do You Need to Correct for Temperature?
If your sample is close to the hydrometer’s calibration temperature, the correction is small. If the sample is significantly warmer or colder, correct the reading.
You can use:
- A temperature correction calculator
- A hydrometer correction chart
- Brewing software
For example, if your hydrometer is calibrated at 60°F and your wort is 75°F, the reading needs a correction. Do not guess the correction for large temperature differences.
Do Not Measure Hot Wort
Do not put boiling or very hot wort into a glass hydrometer jar.
This can:
- Break the glass
- Cause burns
- Produce an inaccurate reading
Cool the sample first. A wort sample should be cool enough to handle safely before you measure it.
Do You Need to Cool a Sample for Fermentation Readings?
Yes.
If you remove a sample from a fermenter, measure its temperature. If it is outside the hydrometer’s calibration temperature, apply the appropriate correction. Do not place a hot sample directly into a hydrometer test jar.
What Does a Reading of 1.000 Mean?
A reading of 1.000 means the liquid has approximately the same density as water at the hydrometer’s reference conditions.
A dry fermented beverage can finish close to 1.000. Some beverages can finish below 1.000. This happens because alcohol is less dense than water.
A dry beer may finish around:
1.005–1.015
A dry cider may finish around:
1.000 or slightly below
A dry wine or mead can finish below:
1.000
These are examples, not required targets.
What Does a Reading Above 1.000 Mean?
A reading above 1.000 means the liquid is denser than water.
Fermented beverages often remain above 1.000 because they contain:
- Residual sugar
- Dextrins
- Acids
- Proteins
- Other dissolved compounds
A beer finishing at 1.012 is not necessarily sweet. Similarly, a mead finishing at 1.010 is not necessarily sweet.
Gravity alone does not completely describe perceived sweetness.
What Does a Reading Below 1.000 Mean?
A reading below 1.000 is possible.
Alcohol is less dense than water. A highly fermented beverage can therefore have a specific gravity below 1.000. Do not assume that a hydrometer reading below 1.000 means the hydrometer is broken.
Check the hydrometer in plain water if you are concerned.

How to Calculate Alcohol Content
You can estimate alcohol by volume using the original and final gravity.
A common formula is:
ABV ≈ (OG − FG) × 131.25
For example:
OG = 1.060
FG = 1.010
The calculation is:
(1.060 − 1.010) × 131.25 = 6.56% ABV
The actual alcohol level can differ from this estimate. The formula provides an approximation.
Why Is My Gravity Not Changing?
If your gravity readings remain the same, several explanations are possible.
Fermentation Is Complete
This is the simplest explanation.
Fermentation Is Stalled
The yeast may have stopped before consuming all available fermentable sugar.
The Starting Gravity Was Incorrect
Your original measurement may have been affected by:
- Poor mixing
- Incorrect temperature
- Incorrect volume
- Reading error
The Sample Is Not Representative
If the fermenter contains unmixed sugar or other material, the sample may not represent the entire batch.
Mix carefully when appropriate. Do not introduce oxygen into actively fermenting beer.
How Often Should You Take Readings?
Do not take readings simply because you are curious.
Each sample removes beer – especially if you are discarding the sample. Each time you open a fermenter, you create an opportunity for contamination and oxygen exposure.
A useful schedule is:
- Take the original gravity.
- Take a reading near the expected end of fermentation.
- Take another reading two or three days later.
- Bottle or package when the readings are stable.
You may need additional readings when troubleshooting.

Do You Have to Use a Hydrometer for Every Batch?
You can make homebrew without one.
However, a hydrometer provides information that you cannot reliably get from:
- Airlock bubbles
- Appearance
- Time
- Taste
- Foam
A hydrometer is inexpensive compared with the ingredients and time invested in a batch.
For that reason, it is one of the best tools a new homebrewer can buy.
Hydrometer vs. Refractometer
A refractometer is another tool for measuring dissolved sugars.
It uses a small sample. This can be useful on brew day because you only need a few drops.
However, alcohol affects refractometer readings. Once fermentation begins, you must use a correction calculation. A hydrometer is usually simpler for a beginner.
Advantages of a Hydrometer
- Easy to use
- Relatively inexpensive
- Direct specific-gravity reading
- Useful before and after fermentation
- No special conversion is normally required
Advantages of a Refractometer
- Requires a very small sample
- Fast
- Useful during brewing
- Easy to carry
For a first homebrew setup, a hydrometer is usually the better choice.
Common Hydrometer Mistakes
Reading From Above
This can cause a reading error.
Read the hydrometer at eye level.
Forgetting Temperature
A sample far from the calibration temperature can produce an inaccurate reading.
Letting the Hydrometer Touch the Jar
The hydrometer must float freely.
Reading the Wrong Scale
Some hydrometers have several scales.
Make sure you are reading specific gravity.
Leaving Bubbles on the Hydrometer
Bubbles can change the way the hydrometer floats.
Spin it gently to release attached bubbles.
Dropping the Hydrometer
Glass hydrometers break easily.
Lower them carefully.
Returning the Sample to the Fermenter
Do not return the sample unless you’re very confident in your sanitizing practices. The sample has been exposed to the environment and equipment.
Lots of folks drink it or discard it if they’re working with a larger batch, like 5-gallons or more.

How to Clean a Hydrometer
After use:
- Rinse the hydrometer.
- Remove any residue.
- Clean it with a suitable cleaner if needed.
- Rinse according to the cleaner instructions.
- Allow it to dry.
Do not use abrasive materials and do not scrape the glass.
Store the hydrometer where it cannot fall – preferably in the storage tube it came in.
How to Check Your Hydrometer
If you suspect that your hydrometer is inaccurate, test it with water.
Use clean water at the hydrometer’s calibration temperature.
The reading should be close to:
1.000
A small difference can occur.
Check the manufacturer’s stated accuracy. If the hydrometer is significantly outside the expected range, it may be damaged or defective.
The Hydrometer Is a Decision-Making Tool
The most useful part of a hydrometer is not the number itself. It is what the number tells you.
For example:
Airlock is not bubbling.
That does not tell you much.
Gravity was 1.070 and is now 1.030.
Fermentation is active.
Or:
Gravity was 1.070 three days ago and is still 1.010 today.
Fermentation is probably complete.
Or:
Gravity was 1.070 three days ago and is still 1.040.
You may have a stalled fermentation. The hydrometer turns a guess into a measurement you can act on.
A Simple Hydrometer Routine
For a beginner, use this process:
On Brew Day
Measure and record the original gravity.
During Fermentation
Wait until fermentation appears to be nearing completion.
Take a gravity reading.
A Few Days Later
Take another reading.
If the Numbers Match
Fermentation is likely complete.
If the Number Is Still Decreasing
Wait. Fermentation is still occurring.
Before Bottling
Confirm that the gravity is stable.
The Most Important Hydrometer Rule
Do not bottle based on time or airlock activity.
Bottle based on stable gravity readings.
If your beer has been fermenting for 14 days and the gravity is stable, it may be ready. If your beer has been fermenting for 30 days and the gravity is still decreasing, it is not ready. The calendar does not determine when fermentation ends: the yeast does.
The hydrometer lets you see what the yeast is doing.
A Hydrometer Is Worth Having
A hydrometer is one of the least expensive pieces of equipment in a homebrew setup.
It can help you:
- Measure original gravity
- Monitor fermentation
- Estimate alcohol content
- Diagnose fermentation problems
- Confirm fermentation is complete
- Avoid dangerous overcarbonation from premature bottling
You do not need to take measurements every day and you do not need complicated equipment.
Once you understand this simple process, the hydrometer becomes one of the most useful tools in your homebrewing equipment.